| My Favorite Graham Cracker Crust |  |
Homemade Graham Cracker Crusts for Pies, Not Too Sweet, Not Too Buttery. Just Two Ingredients. Year-Round Kitchen Staple. Budget Friendly. Weeknight Easy, Weekend Special. Potluck & Party Friendly. Easy DIY. Vegetarian.
Please Don't Make Fun.
Promise that you won't laugh, okay? Or that you'll laugh with me not at me?
Because here's the thing. I.CANNOT.MAKE.JELLO. Jello!
But there's more. I.CANNOT.MAKE.GRAHAM.CRACKER.CRUSTS.
Jello I can live without. But to bake a pie for #PieDayFriday every week, a fool-proof graham cracker crust recipe is essential.
And I'm picky. Great flavor. Not too much sugar. Not too much butter. But also? Crisp and sturdy, like store-bought graham cracker crusts.
I've tried so many combinations of graham cracker crumbs, sugar and butter. While they are "okay" none measured up to my expectations.
- Add more sugar (my recipe adds none, other recipes range from 3 tablespoons to 8 tablespoons) and the crust is crisp but tastes too sweet.
- Add more butter (my recipe uses 4 tablespoons, other recipes range from 5 to 8 tablespoons) and the crust holds together but exudes greasy butter.
But I've nailed graham cracker crusts by using two Trader Joe's products. If Trader Joe's ever pulls these from the shelves, No.More.Pie. Well, no, it'll be back to regular pastry, my Flaky Tender Pie Crust.
But noooooooo! Some pies just demand the crisp, sturdy sweetness of a good graham cracker crust. Besides that? A graham cracker crust means pie-on-a-whim. Hungry for pie? Pie-crust pies demand planning ahead, all that mixing and chilling and rolling and chilling and baking and cooling and and and... The list feels endless some Fridays when, really, I just wanna slap together a pie for dinner.
Good news, both these Trader Joe's products are easy to keep on hand and shelf stable. That means they KEEP! They're the only two ingredients in My Favorite Graham Cracker Crust.
Trader Joe's Old-Fashioned Cinnamon Grahams – Great graham crackers, these, all sweet and cinnamon-y. Each tub contains enough for 2 1/2 crusts, I usually make two plain graham cracker crusts and then another that's half graham cracker crumbs and half chocolate cookie crumbs for Fresh Strawberry Pie.
Trader Joe's Clarified Butter (Ghee) – Clarified butter is easy to make with a stick of butter, it's really just the butterfat that remains once the liquid in butter is cooked off. I'm not sure why I bought an eight-ounce jar, way back whenever. But the first time I used clarified butter for a graham cracker crust was out of necessity: it was a Friday and I needed a pie crust and was completely out of butter. The clarified butter in the fridge was months old but I went for it. That first crust? It was my first good graham cracker crust in a long while! Now I keep Clarified Butter on hand all the time and use it exclusively for crumb crusts.
For the record, this post is NOT sponsored by Trader Joe's. These two products just helped me finally crack the code for good graham cracker crusts, including in the fragrance department. This graham cracker crust smells so good while it bakes. My 91-year old pie-lovin' father says, "THAT smells good, whatever it is. Smells like butterscotch."
P.S. I still can't make Jello. Please send help.
The Art of Shaping a Graham Cracker Crust
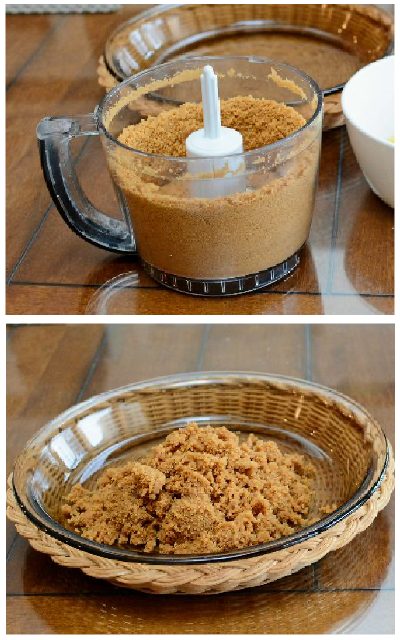
Top Photo – If you have one, a mini food processor works beautifully to process the graham crackers into crumbs and to bind the crumbs with clarified butter. For a smooth, even crust, make sure the crumbs are finely ground. For a crisp, sturdy crust, make sure the crumbs are evenly wet.
No mini food processor? No problem. A large food processor works well too, just be sure to scrape the blade and sides several times.
But in my kitchen, a mini food processor is a real work-horse even if it doesn't/won't/can't replace a full-size food processor. I pull out this mini food processor (affiliate link) every couple of weeks to make My Everyday Creamy Herb Salad Dressing but just in the last few days, say, it's been handy for small batches of Homemade & Semi-Homemade Pub Cheese and Slow-Roasted Tomato Salsa. To my mind, it's well worth the investment, both money and space.
Bottom Photo – Dump the wet graham cracker crumbs into a glass pie pan, they should be like wet, clumpy sand. Then settle in somewhere comfortable, you're going to go all "Dirty Dancing" shaping the crust with the back of a soup spoon, really getting in there.
The goal is to evenly coat the pie pan with crumbs. Focus on covering the sides first, then the bottom, then come back to compact and perfect both the sides and bottom.
You're going to make several passes, so don't worry about getting everything right in the first or even the second time around.
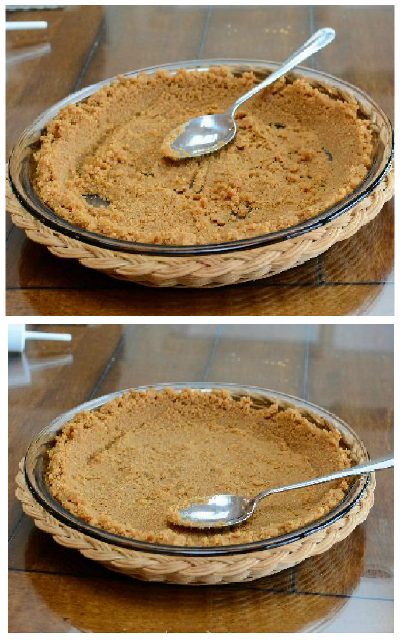
Top Photo – This is the first pass so start off by roughly distributing the crumbs. During the first pass, the idea is just to make sure the crumbs are evenly distributed to cover the sides and the bottom. Start off by moving crumbs up the sides. Do finish the sides before spreading the remaining crumbs off the bottom. Don't compact or shape the crumbs yet.
Bottom Photo – Now it's time to compact the crumbs the crust. Compacting the crumbs is really key, take your time here, really pressing the crumbs to the pie plate.
Start with the sides first, pressing the crumbs with the back of the spoon, as you compact the crumbs, gently push the crumbs upward to build the sides almost to the top of the pie pan, don't worry about perfecting the top edge quite yet. When I do this, I'm usually compacting with my right hand, using my left hand to rotate the pie pan for easier access. In this step, I'll rotate the pan at least twice, compacting a little more each time.
Once the side walls are in place, then compact the crumbs on the bottom of the pan, evening them out at the same time.
Top Photo – Now focus on the corners (where the sides and the bottom meet) where the crumbs can collect too thick. Use the edge of the spoon to create a sharp edge where the sides and bottom come together. Depending on where you need more crumbs, when creating the edge, you might press the crumbs upward on the sides or downward to the bottom. Again the point is to create an even distribution of crumbs across the sides and the bottom, so the crust will be the same thickness throughout.
Bottom Photo – Once crumbs are fully in place, make two or three or even more rotations compacting the crumbs on the sides (also compacting the top of the sides to make a nice neat top edge) and across the bottom. The tighter the crumbs are compacted, the crisper and stronger the crust after it's baked. That's a good thing!
Bookmark! PIN! Share!
How do you save and share favorite recipes? recipes that fit your personal cooking style? a particular recipe your mom or daughter or best friend would just love? If my favorite not-too-sweet, not-too-buttery Graham Cracker Crust inspires you, please do save and share! I'd be honored ...
~ PIN This Recipe ~
MY FAVORITE GRAHAM CRACKER CRUST
Time to table: 1 hour
Makes 1 shallow 9-inch pie crust
- 13 Trader Joe's Old-Fashioned Cinnamon Grahams crackers (6oz/175g)
- 4 tablespoons (40g) Trader Joe's Clarified Butter (Ghee)
Heat oven to 350F/180C.
Break up the graham crackers with your hands, then drop into a food processor and process until the crumbs are very fine and even, make sure there are no larger chunks.
If the Clarified Butter is at room temperature, just measure it out. If it's cold, right in the bottle, melt the Clarified Butter in the microwave 10 seconds at a time until it's liquified and then measure out.
Drizzle the butter over top of the graham cracker crumbs, pulse two or three times until the fat is evenly distributed. Alternatively, stir together the crumbs and butter, pressing hard so that the crumbs absorb the butter. Either way, the goal is for the crumbs to become evenly wet and beginning to clump.
Dump the wet crumbs into a glass pie pan. Use the back of a soup spoon to evenly coat the pie pan with crumbs, focusing first on covering the sides, then the bottom, then come back to compact and perfect both the sides and bottom. (See Step by Step Photos for a graham cracker crust, above.)
Bake crust for about 7 - 9 minutes, 8 minutes is perfect in my oven. The crust will appear soft and warm but will harden as it cools. You don't want to overbake the crust, it will be more difficult to release from the pan when you're slicing the pie.
Be sure to let the crust cool before filling it.
MAKE-AHEAD TIPS If you like, make the crust up to a day or two ahead of time. Let cool, cover and refrigerate.


 Some bakers like to use the bottom of a measuring cup to compact the crumbs so give that a try too. I like the control that a spoon offers.
  Do you "have" to bake a graham cracker crust? After all, aren't the cookies already baked, won't the butter and sugar hold the crust together without that extra step? I've done it both ways, baking the crust just for a few minutes really compacts the crust, making it extra sturdy. Try it both ways yourself, see what works for you!
FOR MORE INFO If you "skipped straight to the recipe," please scroll back to the top of this page for ingredient information, ingredient substitutions, tips and more.
 If you print this recipe, you'll want to check the recipe online for even more tips and extra information about ingredient substitutions, best results and more. See
 https://www.kitchenparade.com/2017/05/my-favorite-graham-cracker-crust.html .


Quick Nutrition Note Before doing the math, I really didn't know how My Favorite Graham Cracker Crust would compare to a traditional graham cracker crust. If TJ's Cinnamon Grahams had more sugar and the clarified butter was pure butterfat, I wondered if my recipe would end up with more calories and Weight Watchers points. It didn't! And while it wasn't the point, I was quite happy about that! Just look! They're comparable!
My Favorite Graham Cracker Crust Per Slice (assumes 8): 155 Calories; 10g Tot Fat; 4g Sat Fat; 0mg Cholesterol; 54mg Sodium; 13g Carb; 1g Fiber; 4g Sugar; 1g Protein.
 WEIGHT WATCHERS Old Points 4 & PointsPlus 4 & SmartPoints 6 & Freestyle 6 & myWW green 6 & blue 6 & purple 6 & future WW points
Traditional Graham Cracker Crust Per Slice (assumes 8 slices; also same amount graham cracker crumbs, 6 tablespoons butter, 5 tablespoons sugar): 175 Calories; 10g Tot Fat; 6g Sat Fat; 22mg Cholesterol; 156mg Sodium; 20g Carb; 0g Fiber; 13g Sugar; 1g Protein.
 WEIGHT WATCHERS Old Points 3 & PointsPlus 4 & SmartPoints 8 & Freestyle 8 & myWW green 8 & blue 8 & purple 8 & future WW points
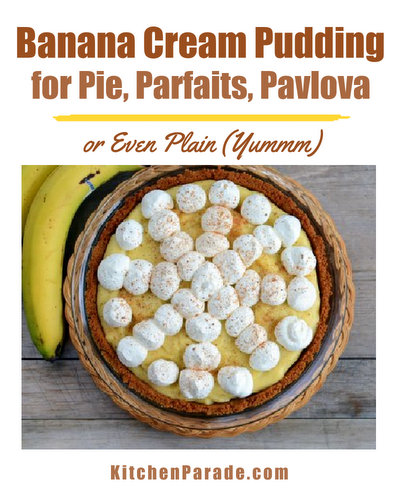
- THE RECIPE Banana Cream Pudding For pie, parfaits, pavlova and even (yummm) plain. (PIN This)
- ANOTHER TAKE Lemon Meringue Pie Sunny slivers of the lemony classic.
- THE RECIPE Easy Margarita Pie Tastes just like a good margarita!
- ANOTHER TAKE Blueberry Cheesecake Pie Cheesecake topped with homemade blueberry pie filling. No bake!
- THE RECIPE Frozen Chocolate Peanut Butter Pie A creamy concoction, with just a hint of peanut butter and a drizzle of chocolate.
- ANOTHER TAKE Fresh Strawberry Pie Fresh glazed berries in a homemade chocolate-cookie crust, a real crowd pleaser. (PIN This)
Surprising Ways to Use Graham Crackers
~ Chocolate Raspberry Icebox Cake ~~ Graham Cracker Toffee ~
~ Extra-Crispy Apple Crisp ~
~ ~
more
~ graham cracker recipes ~
Shop Your Pantry First
(helping home cooks save money on groceries)~ graham cracker recipes ~
~ All Recipes, By Ingredient ~
~ How to Save Money on Groceries ~
© Copyright Kitchen Parade
2017, 2019 & 2023







>Promise that you won't laugh, okay? Or laugh with me not at me? Because here's the thing. I CANNOT MAKE JELLO. Jello! ... Please send help.<
ReplyDeleteWell, I'm definitely not going to laugh, because, you see, your thing is my thing: I, too, cannot make Jell-O gel! How helpful is knowing that fact to you? Probably not very. But hey, at least you now know you're not alone in your liquidy-ness!
An alchemist I am not. Since 1995, while trying to make my then 5yo son a Watermelon Cream Pie (Jell-O and Cool Whip blended & chilled in a graham cracker crust) for his birthday, I never got that darn stuff to "set up" properly. But, oh boy, did I try...
I followed the box's instructions precisely; no jiggle. I thought maybe my boxes of gelatin were old, so I tossed them and bought new ones; no jiggle. I thought maybe my fridge was not cold enough, so I dialed down its temp; no jiggle. I thought, hmm, maybe my mixing bowls were too warm or too cold. I tried metal, porcelain and glass bowls; no jiggle. Then I got desparate. I hired my neighbor—a professional chef—to come over to my house, to "teach me" how to make Jell-O gel! And, guess what? Not even her Jell-O gelled!
So, now I say, "I cannot get Jell-O to gel in THIS house." My neighbor, the chef, made my son's Birthday Pie that year, in her home. She made a couple more for him (me?) in subsequent years. Fortunately, my son outgrew his taste for sugary things, grew up and moved out. Perhaps when my husband and I retire to a senior community, I will attempt to make a jiggly gelatin pie again. Only then, it'll be entirely from scratch and will not contain Jell-O nor Cool Whip.
--Mae ... OTP in the ATL
Mae ~ Oh my, I am roooooooling on the floor laughing. So glad I’m not alone!
ReplyDelete