| Orange-Kissed Marshmallows |  |
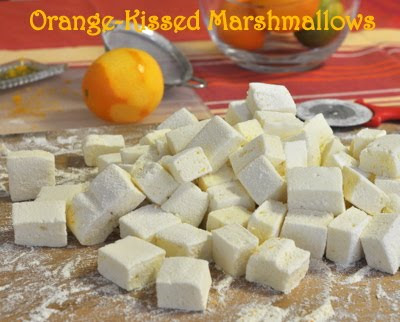
Ever wonder if there's a way to make handmade marshmallows? There is! To prove it, I've made Orange-Kissed Marshmallows and y'know, it was really fun. Get ready, it's Marsh Madness!

Welcome to Marsh Madness, the celebration of the sugar confection that is the homemade marshmallow which has what? – alliteration aside – to do with March Madness, the NCAA Basketball Tournament? Nothing, dear readers, but we’re stickin’ to the story, okay?
Once upon a time, I made a big impression on two diehard Canadian sports guys (one is now this bigshot with the CFL) who almost splurted their beers when a certain American banker in short skirts and high heels (didn’t I say "once upon a time"?) was Sweet Sixteen conversant and had at least 60 seconds of intelligent understanding of a certain KU-KState boys basketball matchup.
And now I hope to impress the judge of all-things-Marsh-Madness, cookbook author and marshmallow maven Shauna Sever to make my way to the Final Four of food bloggers participating in this friendly competition of Marsh(mallow) Madness.
I’ve been assigned to the Western Bracket – that’s me from the middle-of-the-country Missouri with four bloggers from right-there-on-the-Pacific-Ocean California which makes as much sense as Mizzou switching from the Big Eight (oh wait, it was the Big Twelve there at the end) to the SEC, the SouthEast Conference. But I digress.
In the mean time, I really did have big fun making marshmallows at home, learning lots and turning out three batches of perfect marshmallows, Vanilla (too plain and sugary for my taste), Black Walnut (which were wondrous and very Missouri-ish but which don’t really work with the more-available English walnuts so which I nixed for sharing here) and then my very favorite, these orange-kissed marshmallows, bright and perky, sugary but with lots of orange essence.
Want to follow all the fun? On Twitter, use the hashtag #MarshMadness. Serious Eats is a sponsor, here's what they're posting. And check out the Marsh Madness brackets at Quirk Books, the publisher and sponsor.
Better yet, make your own marshmallows! Naturally, I have tips.
WORK AREA The syrup is sticky-sticky, even a careful cook (ahem) might make a mess. Consider putting down a silicone mat to work on. Have a sink of hot water waiting for pots, measuring cups, spatulas, spoons, etc.
PAN SIZE I prefer using a 9x13 for about ten dozen bite-size marshmallows (cutting 9 slices one way, 13 the other) but the inspiring recipe specifies an 8x8 for 25 large, thick marshmallows (cutting 5 slices one way and 5 the other).
SAUCEPAN for STOVETOP SYRUP Choose a medium-size saucepan, I use a two-quart saucepan and it’s big enough to allow for the syrup to swell up. My favorite LeCreuset pot is a little heavy for lifting and pouring hot syrup into the standing mixer so I switched to a lighter one, much better.
KITCHEN SCALE This is an easy recipe to work with weight not volume. It’s lickety-slick to place the saucepan onto the scale and add the Stovetop Syrup ingredients by weight. It works that way for the bowl of the standing mixer too! Sweet!
CANDY THERMOMETER A glass thermometer will make life easy, just make sure that the bulb doesn’t touch the bottom of the saucepan. For experienced candy-makers without one, the Stovetop Syrup cooks to the “soft ball” stage.
STANDING MIXER I love my hand mixer and happily baked without a stand mixer for thirty years (yikes). But marshmallows, I think, really do require one. Ask a neighbor if you can borrow hers in exchange for marshmallows!
OTHER USEFUL TOOLS A sieve helps evenly spread the coating onto the still-sticky marshmallows but you could also use a teaball for loose tea or a “fairy duster” used for making pie crust. A pizza cutter is slick-slick-slick for cutting the marshmallows into pieces.
HOT SYRUP Hot syrup is hot-hot-hot and it will burn-burn-burn. Be very careful when pouring into the mixer.
WHEN IS IT MIXED ENOUGH? I made three batches of marshmallows and followed these instructions exactly with 100% success following nothing but the time instructions. Still, just so you know, after whipping, the mixture should be the consistency of the thickest meringue you can make.
WEATHER Weather supposedly makes a difference when you’re making marshmallows, the dryer the better. But I was basically forced to make marshmallows on two of the wettest and dreariest winter Missouri days. No problem.
ALTITUDE If you live anywhere other than at sea level, you’ll need to adjust the temperature to aim for when cooking the syrup. You probably already know the calculations, right? If your water boils at 202F instead of the 212F at sea level, you’ll need to shoot for ten degrees less than 250F, that is, for 240F.
SO CALL ME OLD-FASHIONED Who else loves that the old-fashioned candy-making measurements of “soft ball” and “hard ball” require no tools and no math?
ORANGE-KISSED MARSHMALLOWS
Time to table: 9 hours
Makes a 9x13 pan (almost 10 dozen bite-size marshmallows)
-
STOVETOP SYRUP
- 3/4 cup (160g) sugar
- 1/4 cup (80g) light corn syrup (that's clear corn syrup, not the “lite” with Nutrasweet corn syrup and not the dark corn syrup some folk like on pancakes)
- 1/4 cup (60g) water
- 1/4 teaspoon table salt
-
STANDING MIXER
- 1/4 cup (60g) cold water
- 4-1/2 teaspoons (16g, that’s 2 Knox gelatin envelopes) powdered gelatin
- 1/2 cup frozen orange juice concentrate, thawed but cold
- 1/4 cup (80g) light corn syrup
- 1 teaspoon orange extract
-
COATING
- 1/2 cup (70g) powdered sugar
- 3 tablespoons (25g) cornstarch
- Zest of an orange
STOVETOP SYRUP Measure ingredients into a medium-size saucepan and stir with a wooden spoon just to combine. Attach the candy thermometer to the side of the pot. Bring the mixture to a boil on medium high and let boil until the mixture reaches 250F – aim for rapid bubbles not furious bubbling. The mixture can bubble away by itself but an occasional stir won’t hurt. Keep a close eye on the thermometer while proceeding, the move from 200F to 250F can go fast.
STANDING MIXER Meanwhile, insert the “whisk” attachment, it’s the one with balloon-shaped wire blades used for whipping cream.
Measure the water into the mixer bowl. Sprinkle gelatin over top and stir in with a spoon. Stir in orange juice concentrate. Let rest 5 minutes, it will noticeably thicken.
Add 1/4 cup corn syrup and turn mixer on the lowest speed, let run on low until the syrup is ready.
MAKE MARSHMALLOWS! As soon as the syrup is ready, work quickly but carefully. Slowly pour the syrup into the mixing bowl while the mixer is still running on low.
Turn up speed to medium and mix for 5 minutes. The mixture will cool and begin to thicken and inflate.
Turn up speed to medium high and mix for another 5 minutes. During this time, the mixture will triple in volume and become thick and increasingly glossy.
Add the orange extract and turn up speed to high and mix for another 1 to 2 minutes. Use a knife to scrape marshmallow mixture off the whisk blades into the bowl.
PREPARE PAN While the mixture whips, spray a 9x13 pan or 8x8 pan.
COATING While the mixture whips, measure sugar, cornstarch and orange zest into a small food processor and whiz a few times to make a fine, orange-y powder.
PULL IT ALL TOGETHER Pour the marshmallow mixture into the pan and spread smooth to the edges. Use a sieve to sprinkle about half the Coating evenly over the top.
COOL & CURE Let rest – uncovered for better drying – in a cool place for 8 hours, a garage and a wine cellar worked great here.
CUT & COAT Run a knife along the side of the pan to help release. Turn the pan over, releasing the marshmallow in one big whomp onto the mat. Sprinkle the remaining coating onto the sticky side.
Use a pizza-cutter to cut into pieces. This is the moment when you look to the heavens and say, “Mom, you won’t believe this bu I just made marshmallows!” Then calm down and get back to work. With your hands, gently toss the pieces in the loose coating, coating the pieces on all sides of each piece.
TO STORE Store marshmallows in a single layer in tins lined with waxed paper, leave the lids slightly cracked so air can get in. Save any excess coating in a small ziplock bag just in case the marshmallows need more later. In my experience, they do.
SAVOR! Best eaten within a few days but if stored in a dry cool place, taste fresh even several weeks later but do need another toss in the coating.
MANY THANKS to Quirk Books and the very quirky Eric Smith, who blogs at Eric Smith Rocks (and he does) and who corralled us all into this fun little blogging competion.
Win a Copy of Marshmallow Madness - Sorry, These Are Closed Now
Several bloggers are sponsoring give-aways for the cookbooks. Check out Kitchen Konfidence and Love Veggies and Yoga.
Other participating bloggers who have already posted their marshmallow ideas are Sweets by Sillianah and Teenie Cakes. Be sure to check them out!
Still more will post during the next couple of weeks. So you'll want to check out Baked Bree on February 28, Homemade Quirk on February 29, Barbara Bakes on March 1, Foodie Bride on March 2, Cleaning Plates on March 5, Cinnamon Spice & Everything Nice on March 6, Small Kitchen College on March 7, Culinary Cory on March 8, The Queen's Notebook on March 9, Ice Cream Before Dinner on March 13, The Kitchenarian on March 14, Nibble Me This on March 15, Love & Olive Oil on March 16. Whew.
Cutting Perfect Marshmallow Squares Is Easy

Just use a pizza cutter! I used a 9x13 pan and cut 9 rows one way and 13 the other. This makes nearly ten dozen bite-size marshmallows, the perfect size, if you ask me.
This Week, Years Past 2002 - 2011
Chicken Cacciatore (<< personal favorite) Greek Feta Chicken
Mushroom Soup
Pork & Poblano Skillet
Gashouse Eggs
My Mom's Pancake Recipe
Homemade Spaghetti Meat Sauce
Sugar-Free Raspberry Bliss
This Week, Elsewhere
Beggar's Purses from McGurk's Public House
My Column in the St. Louis Post-Dispatch
More Candy Recipes
Bet You Didn't Know These Can Be Homemade Too
Shop Your Pantry First
© Copyright 2012 Kitchen Parade


Looks delicious!! I'm sure these would be perfect with a mug of hot cocoa :)
ReplyDeleteBrandon ~ Ah yes, orange and chocolate, a classic combination. Maybe a little sliver of dark chocolate alongside or -- wait -- no, this is it -- a corner of the marshmallow dipped in dark chocolate, just a corner, just a small bit of contrast. Wish there were some left!
ReplyDeleteLove the name Orange Kissed. I'm sure I'd love them too.
ReplyDeleteHi Alanna: Like Barbara mentioned - love the name "orange kissed" and I like the idea of a fresh citrusy mallow. These would be fun with those little Cutie mandarin oranges too! :)
ReplyDelete